The LED Page
LEDs come in all sizes and shapes. They are wildly used in applications ranging from small clocks to giant displays to traffic lights.
Light Emitting Diodes are different from light bulbs in many ways:
| Light Bulb |
LED |
| Light is produced when a thin metallic wire is brought at a very high temperature by the flow of electric current. |
Light is produced at the diode's junction when electrons are converted into photons. |
| The color of the light can be changed somewhat by changing the type of gas present inside the bulb. Most light bulbs have a very broad color spectrum. If a particular color is needed, then a colored lens has to be used. |
The color is defined by doping the diode with various chemicals. The color spectrum of an LED is narrow. |
| A light bulb produces a lot of infra red light which result in the bulb becoming very hot during use. |
An LED is a lot more efficient: because it produces light with a narrow spectrum, it generates little or no infra red and stays cool. |
| A light bulb is mostly a resistor. |
An LED is a diode: this means it will let the current flow only one way. |
An other benefit of the LEDs is their long life: typically over 10000 hours. That's over 10 year on continuously! In a traffic light application, a cluster of red LEDs will live for 12 years compared to a less efficient light bulb's life of 12 months...
|
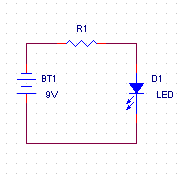
This drawing shows a very basic circuit used to power an LED. The resistor shown is necessary to limit the current flowing through the LED. LEDs typically need between 5mA and 20mA to produce clearly visible light while staying below their maximum power dissipation. An LED is characterized, like any other diode, by its maximum forward current, its forward voltage and its maximum reverse voltage.
An LED is a poor rectifier: its maximum reverse voltage is usually around 5V; rectifying diodes have a maximum reverse voltage of several hundred volts!
If you need to connect an LED to an AC source: just mount two of them in parallel and in opposite direction. This way the LED that is on will draw some current and present a limited voltage that will be well within the specification of the other LED.
|
The value of the resistor in the above drawing depends on three things: the voltage available at the power source (a nine Volt battery in our example), the amount of illumination required by the application (this is more or less linearly linked to the current flowing through the LED's junction) and the exact type of LED used.
For non critical use (like a power on light for a circuit that draws a lot of current) the following numbers and formula can be used:
With Vsource being the voltage delivered by the power source and Vf the forward voltage of the LED.
| Color |
Vf |
| Red |
1.5V |
| Yellow |
1.8V |
| Green |
2V |
Of course, a smaller current will result in less light, but it will extend the battery life in a portable application!
While on the subject of efficiency, the above circuit could be modified by adding several LEDs in series (four red ones, total, for example), so less power will be dissipated in the resistor and more power will be converted into light.
LEDs are nice as power on indicators, but one thing they are good at is blink. Unlike light bulbs which see their life span severely shorten when blinked, LEDs' life is pretty much the same whether they are continuously on or blinked.
To blink an LED, you need some kind of electronic circuit to drive it. The simplest is show here.
|

|
This circuit is not very useful, but if you replace the left battery by the output of a logic IC, now things become more interesting! The transistor is used as a switch: it is either completely saturated or completely blocked.The value of the base resistor can be calculated as follow:
The number 10 in the above formula is the gain of the transistor when it is fully saturated. Such a low number garanties that no matter how lousy the transistor you pick is, the circuit will still work. In applications where overall system power dissipation is critical, the exact gain of the transistor should be used.
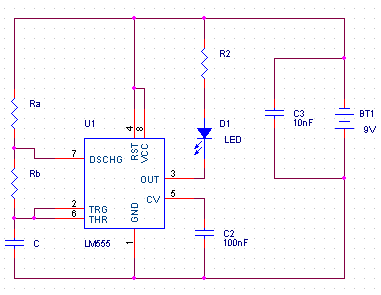 |
So, how do we blink an LED? Well, there are many circuit that generate some sort of square wave at one of their nodes, but one of the most reliable and simple circuit is based around the LM555 precision timer IC.
One neat feature of the LM555 is that it can sink and source up to 100mA, so it can drive several LEDs directly. If you are planning on having a "heavy" load on the output, be sure to buy the bipolar based version of the IC (LM555) and not the CMOS version.
The various external components can be selected to create square waves with periods ranging from a few micro-seconds to several seconds (or even minutes and hours, if tolerances are not an issue).
|
The formulas are:
| Frequency f = 1.44 / ((Ra + 2 Rb) * C) |
| Duty cycle D = Rb / (Ra + 2 Rb) |
Note that the duty cycle and frequency are not independent. If you want independent control, replace Rb by two resistors mounted in series with a diode each in opposite direction. One resistor will be used to charge the capacitor C and the other will be used for discharging C.
The output of the 555 can be used to drive logic chips instead of an LED. This opens up all kinds of possibilities for creating patterns and other simple animations. Here are two possibilities.
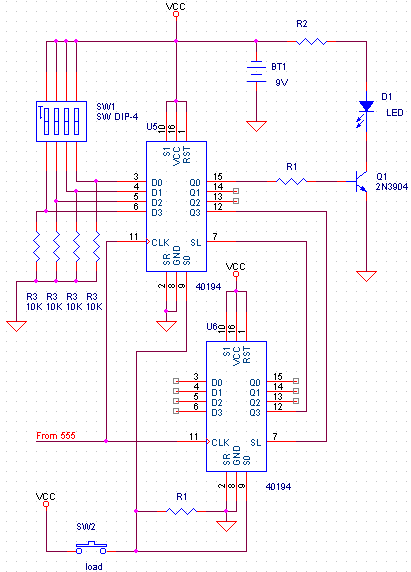
Please note that on the two following schematics, only one LED is shown, in order to reduce the drawing complexity and the pictures' size. The 555 circuit is not shown for the same reasons... One more important thing: these circuit show some chips from the CD4000 series. This technology has the great advantage of being able to be powered from 3V to 18V. These chips are also available in the 74HC00 series; if you do use this family, be careful to limit your supply voltage to 6V.
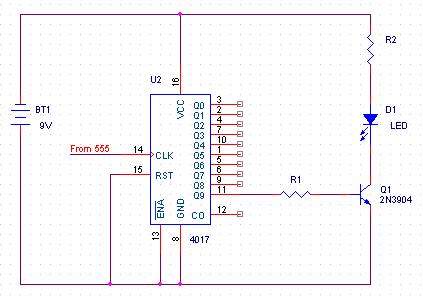 |
The CD4017 is a decade counter: one of the Q output is high and all the other ones are low. Every time its clock input sees a rising edge, the high output moves up to the next Q. Upon reaching Q9, the counter wraps around to Q0...
|
| This circuit shows how to use a shift register (CD40194) as a pattern generator. This circuit can be extended to pretty much any number of output by adding more shift registers. Each register can control up to four LEDs.
Here is how it works: every time the push-button SW2 is pressed, the binary value encoded by the DIP switch is loaded in the shift register. As soon as SW2 is released, the bits get shifted, with their state displayed by the LEDs. Note how the SL and Q3 pins of each chip are connected: SL is the serial input of the shift register. Q3 is the last output, which is at the same time the serial output. By connecting them this way, we create a loop in which the pattern of bits travels.
The Circuit as drawn is really meant for experimenting: for a given application, the DIP switches can be removed and the parallel inputs can be hardwired to either ground or Vcc. Note that the second shift register should also have some DIP switches, but they are not drawn to keep the drawing simpler...
|
 |
Back to my home-page
Copyright 2001, David E. Wegmuller. Please send comments, questions and suggestions to david@wegmuller.org